Mikrotik CRS236-24S+2Q+RM switch: one year usage summary

Mikrotik is known for its cheap 10GBit/s switches. That's the reason I bought one of these back in 2021. Although buying 10GBase-T transceivers is not that cheap, in the end I replaced my good ol' Netgear S3300-28X with the Mikrotik CRS236-24S+2Q+RM running SwOS-2.13. I know the switch can also run RouterOS but to be honest, I do not like the complexity of RouterOS, nor do I need an OS on my switch that provides lots of functionality I definitely will never use (on a switch).
Unfortunately, SwOS comes with a couple of drawbacks:
  • SwOS has a limited password length: It accepts twelve chars but not 20. I didn't check if twelve really is the limit but SwOS refuses to save passwords with 20 chars.
  • No ssh connections possible: All SwOS provides is a very basic http web interface.
  • No https connections possible: The web-interface can only be accessed via http.

Now all these drawbacks are not present in RouterOS but still, that one is totally overloaded with functionalities one never needs in a L2 switch. Furthermore, one small misconfiguration in RouterOS and 10GBit/s transfer speeds are gone because everything gets routed over the switch CPU which is only connected to the switch chip with a 1GBit/s line.

There's one really annoying bug in SwOS-2.13 though, that only recently got confirmed by Mikrotik: The two QSFP+ ports refuse to re-establish a link connection once the remote side gets rebooted. In order to re-establish the link, I found three possible solutions:
  • Reboot the switch. (most effortful solution as the entire network connected to the switch is down while the switch performs the reboot)
  • Un-/replug the QSFP+-cable at the switch. (similarly effortful)
  • Toggle auto negotiation from "auto" to "40G" or vice versa.

And these are the actions that do not work and will not solve the link issue:
  • Reboot the remote device again.
  • Un-/replug the QSFP+-cable at the remote side.
  • Replace the remote NIC (if possible).
  • Use a different QSFP+ cable.

Mikrotik promised a fix for a future SwOS release but I doubt this release will come anytime soon as their priority clearly is with RouterOS (where - again - this issue is not present).

Besides these issues the switch performs really great and - when using a proper transfer protocol - provides reliable 10GBit/s on all of its ports. In summary I do not regret my decision and once Mikrotik finally puts some love into SwOS again, this will become a very nice and satisfying switch for my home network.
Threadripper Pro is really a beast

Finally, I have my new desktop machine up and running since May 8th. As I wanted a strong machine for Gentoo development again, I went with an AMD Ryzen Threadripper PRO 3955WX which is a 16-core CPU with 32 threads running at 3.9GHz base frequency. That should be enough for the upcoming six to eight years. As I also have a couple of VMs in use on this machine, I doubled the amount of RAM compared to my old machine and now have not less than 256GB ECC-RAM to play with. That should be enough to compile Gentoo packages in a RAM-disk and run a couple of VMs at the same time.
Finding a suitable mainboard for this CPU was not hard, but obtaining the board was an adventure of its own. I opted for a Supermicro M12SWA-TF board which was announced in January 2021 with a release date of mid 2021. Unfortunately it took over a year until the board was easily available.
Having this machine now also means an end to my dual CPU-socket usage on desktop systems. I see this as an improvement because that way the mainboard has more space for other stuff and features I consider important for a modern motherboard.

I only had few annoyances while installing Gentoo on that machine. Unfortuantely I couldn't use a Gentoo-clone from my old desktop machine on the new machine because... well... -march=native on my old AMD Bulldozer CPUs produced binaries that don't run on a Threadripper CPU. That is the first time I found AMD-CPUs not being fully downward compatible.
So I went with a fully-blown stage1 installation (as I am used to do since 2003) and simply installed all packages that the world file from my old machine contained. Configuring the kernel and grub was another challenge. I somehow had trouble getting grub being recognized by UEFI and I had to take about half a dozen attempts to get a bootable kernel configured.

Speaking of this machine I should also mention Arsimael who donated an Asus Radeon RX 5700 XT GPU to this system which I would not have been able to afford otherwise.

This machine really is a beast compared to my old machine. Compiling gcc-11 went down from 1:49h to 29 minutes by less than half of the power consumption. That is simply... WOW! Now all I need to do is replacing all the loud chassis fans with Noctuas.

Hardware IOMMU and xhci controllers

You'd think that after the long time that has passed since the first USB3 controllers appeared on the computer market, Linux would have no big issues with USB3. Well, that's as far from reality as one might imagine.
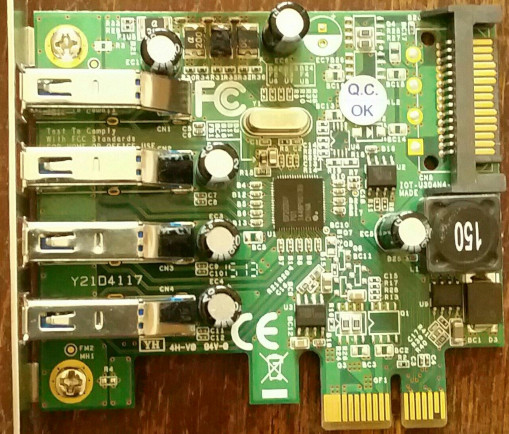
For the last couple of months I had an annoying problem with my USB3 PCIe controller card. One out of four ports were dead and the other ones occasionally refused to work as well. Luckily at least one port always worked and so I just plugged my USB3-hub into that port and continued doing stuff. Fast forward to this week. I replaced my GPU with a more recent model and in order to fit the new card into the PC-tower, I had to shuffle around other PCIe cards. This also required the USB3-controller card to be removed. After I finally got the GPU into a fitting slot, I started to put the other PCIe cards back into the tower when I found a dark spot on my USB3 controller card:
broken_USB3_card.jpg
To my surprise some electronic part on that card had burnt and left a spot the size of a human thumb nail being entirely black. Now I had my explanation why one of the USB3-ports was always dead. Of course I didn't want to put a semi-broken card back into my PC so I tried to replace it with a spare part. And that's where the real fun began.

Booting Linux with that spare USB3 PCIe-card immediately resulted into the IOMMU shutting down the new USB3-card. What I found out the hard way with three(!) different USB3-controller cards was that no matter what kind of chip is being used on the cards, there's always some issue.
Apparently, cards with a "Renesas" chip don't have IOMMU issues but if you happen to use a card with too many of these chips being soldered onto the card, Linux just shuts the entire controller card down because Renesas chips seem to be the worst possible USB3 controller chips availabe with just way too many quirks.
On the other hand, cards with either "VIA" or "ASMedia" chips get in trouble when a (buggy?) hardware IOMMU is in use. My new card with two ASMedia chips booted nicely when no USB device was connected to it:

xhci_hcd 0000:09:00.0: xHCI Host Controller
xhci_hcd 0000:09:00.0: new USB bus registered, assigned bus number 8
xhci_hcd 0000:09:00.0: hcc params 0x0200ef81 hci version 0x110 quirks
0x0000000000000010 usb usb8: New USB device found, idVendor=1d6b,
idProduct=0002, bcdDevice= 5.04 usb usb8: New USB device strings:
Mfr=3, Product=2, SerialNumber=1 usb usb8: Product: xHCI Host Controller
usb usb8: Manufacturer: Linux 5.4.51 xhci-hcd
usb usb8: SerialNumber: 0000:09:00.0
hub 8-0:1.0: USB hub found
hub 8-0:1.0: 2 ports detected
xhci_hcd 0000:09:00.0: xHCI Host Controller
xhci_hcd 0000:09:00.0: new USB bus registered, assigned bus number 9
xhci_hcd 0000:09:00.0: Host supports USB 3.1 Enhanced SuperSpeed
usb usb9: We don't know the algorithms for LPM for this host, disabling
LPM. usb usb9: New USB device found, idVendor=1d6b, idProduct=0003,
bcdDevice= 5.04 usb usb9: New USB device strings: Mfr=3, Product=2,
SerialNumber=1 usb usb9: Product: xHCI Host Controller
usb usb9: Manufacturer: Linux 5.4.51 xhci-hcd
usb usb9: SerialNumber: 0000:09:00.0
hub 9-0:1.0: USB hub found
hub 9-0:1.0: 2 ports detected
xhci_hcd 0000:08:00.0: xHCI Host Controller
xhci_hcd 0000:08:00.0: new USB bus registered, assigned bus number 10
xhci_hcd 0000:08:00.0: hcc params 0x0200ef81 hci version 0x110 quirks 0x0000000000000010
usb usb10: New USB device found, idVendor=1d6b, idProduct=0002, bcdDevice= 5.04 usb usb10: New USB device strings: Mfr=3, Product=2, SerialNumber=1 usb usb10: Product: xHCI Host Controller
usb usb10: Manufacturer: Linux 5.4.51 xhci-hcd
usb usb10: SerialNumber: 0000:08:00.0
hub 10-0:1.0: USB hub found
hub 10-0:1.0: 2 ports detected
xhci_hcd 0000:08:00.0: xHCI Host Controller
xhci_hcd 0000:08:00.0: new USB bus registered, assigned bus number 11
xhci_hcd 0000:08:00.0: Host supports USB 3.1 Enhanced SuperSpeed
usb usb11: We don't know the algorithms for LPM for this host,
disabling LPM. usb usb11: New USB device found, idVendor=1d6b,
idProduct=0003, bcdDevice= 5.04 usb usb11: New USB device strings:
Mfr=3, Product=2, SerialNumber=1 usb usb11: Product: xHCI Host
Controller usb usb11: Manufacturer: Linux 5.4.51 xhci-hcd
usb usb11: SerialNumber: 0000:08:00.0
hub 11-0:1.0: USB hub found
hub 11-0:1.0: 2 ports detected


But as soon as I connected some device to that card:

usb 10-1: new high-speed USB device number 2 using xhci_hcd
xhci_hcd 0000:08:00.0: Abort failed to stop command ring: -110
xhci_hcd 0000:08:00.0: xHCI host controller not responding, assume dead
xhci_hcd 0000:08:00.0: HC died; cleaning up
xhci_hcd 0000:08:00.0: AMD-Vi: Event logged [IO_PAGE_FAULT domain=0x0012 address=0x100000000 flags=0x0000]
xhci_hcd 0000:08:00.0: Timeout while waiting for setup device command
usb 10-1: hub failed to enable device, error -62
usb usb10-port1: couldn't allocate usb_device
usb usb11-port1: couldn't allocate usb_device


Yeah! Well done IOMMU! Searching for "IOMMU xhci" results in lots of posts from Linux users who suffer the same problem. Some xhci kernel driver hacker told me that this is an IOMMU issue and usually requires to update the mainboard's BIOS. But my mainboard (Supermicro H8DG6-F) is EOL for quite a while already and the manufacturer told me that there will be no more BIOS updates for this board. So the only other solution was to disable usage of the hardware IOMMU in the Linux kernel. I added the following to my kernel command-line: "amd-iommu=off iommu=soft" and now I can finally use my new USB3 PCIe controller card.

Fun with Areca RAID-Controllers

I am using RAID-cards for about twenty years now and they served me very well over all these years. I went through different brands starting with a Mylex AcceleRAID 170 SCSI PCI RAID-controller back in the year 2000 which I then replaced in 2007 with an Adaptec 4805SAS SAS PCIe card.
What I learned the hard way was that all these "old" controllers were not capable of having RAID-volumes bigger than 2TB or handling hard disks bigger than 2TB. So - again - a new RAID-controller card had to be obtained. This time I chose an Areca ARC-1680ix-12 and - what I found out over the years - that was a mostly good decision. The card has some really nice features I didn't have with my old cards. One feature I instantly started to like was that I could perform firmware updates of that card within Linux. No more DOS boot diskette / USB-memory device. Just unpacking the new firmware files, firing up "CLI64", reboot and voila... new firmware \o/
In 2016 I decided to put my OS on two SSDs configured as RAID-1 on my controller. Booting was significantly faster becaues of the low seek times but the transfer rate was awful… hdparm -t measured about 250MB/s which is even worse than my RAID-10 with 13 ten years old spinning rust which is at about 310MB/s.
So I started reading Areca threads in different hardware forums which took weeks to finish (some threads dated back to the year 2009 and had not less than about 70 pages full of comments) but to no avail. Occasionally some user reported the same issue having low transfer rates with SSDs but not a single hint where the problem comes from or if there's a fix available.
Meanwhile I even replaced both SSDs with different (and bigger :-D) ones but transfer speed was still at disappointing 250MB/s.
The first glimpse what could be wrong I got when I checked my SSDs with smartctl:

CODE:
# smartctl -i -d areca,1/2 /dev/arecactl0 | grep '^SATA Version'
SATA Version is:  SATA 3.1, 6.0 Gb/s (current: 1.5 Gb/s)

The controller showed the same link speed but unfortunately not with the "CLI64" tool but only in the RAID-BIOS or in the archttp web configuration framework.
Alright, so now I knew why my SSDs are so slow but I still had no idea why the controller decided to set the link speed to the lowest possible value. At this point I already ruled out the SSDs being to blame here because of the two different types of SSDs I tried.
Being stuck here I forgot about the issue till I accidentally stumbled upon a changelog file on Areca's FTP-server which describes fixes to the built-in SAS-Expander all Areca RAID-Cards with an "ix" in its model name have:
D)Set the initial Min. speed to 3.0G. for some 6G SATA HDD negotiate as 1.5G.

Jackpot! Exactly my issue. But how to update that SAS-Expander's firmware? Well… unfortunately not so easy like the RAID-Controller's Firmware… now I learned why my Areca RAID-Controller has a built in RJ11 connector. This is actually an RS232 interface that allows direct communication with the built-in SAS-Expander as long as you have a RS232 to RJ11 converter cable. Fortunately the Areca controller I bought had such a cable with it. And even better, Areca provides a downloadable PDF document which describes how to connect and interact with the SAS-Expander... by using Windows + Hyperterminal! :-(
So I had to figure out how to do the firmware upgrade under Linux myself. First I tried different serial terminal programs (cutecom, minicom, screen) but they all failed at uploading the two(!) firmware files even though I used sx for transfer as the documentation said using xmodem/1K is required.
At this point I was really nervous because in order to upload the two files to the expander you first have to erase the corresponding blocks in the expander's ROM. So while the erasing was successful the upload was not. After 90 minutes of try and error I finally got the files uploaded and the SAS-Expander its new firmware. Here's a short list of things you need to do:

  • Connect to the SAS-Expander:
    CODE:
    cu -l /dev/ttyS0 -s 115200

  • Go through the processes like described in the upgrade manual until you reach the point where you are asked to upload the files. Now type ~$ into cu and then paste the following command (with the real filename of course) into cu:
    CODE:
    sx -b -k filename < /dev/ttyS0 > /dev/ttyS0


  • Logout from the SAS-Expander, type ~. into cu, reboot and you should have the new firmware running the built-in SAS-Expander.
    Unfortunately this was still not enough for my second Areca RAID-controller. It still reported my SSDs with 1.5G link speed. So I connected to the SAS-Expander once again and manually set the minimum link speed for the affected devices to 3.0G instead. The following is an example command how to do this. You have to keep in mind that the first hex value is the device, the second hex value is the max speed and the third hex value is the min speed. Since my ARC-1680ix-12 controller only can perform 3.0G link speed as maximum, I set the max and min link speeds the same:
    CODE:
    CLI> LI 0x02 0x9 0x9

    Now save the settings and do not switch cables on your SSDs or you need to set the link speeds again :-)
    After all this hassle, I finally had some satisfying transfer rates:
    CODE:
    # smartctl -i -d areca,1/2 /dev/arecactl0 | grep '^SATA Version'
    ATA Version is:  SATA 3.1, 6.0 Gb/s (current: 3.0 Gb/s)
    # hdparm -t /dev/sda
    /dev/sda:
     Timing buffered disk reads: 1416 MB in  3.00 seconds = 471.72 MB/sec

    My Notebook and its fans...

    Having my Dell Precision M6700 notebook for quite a while already, the only remaining big issue I had was insufficient GPU cooling. Everytime the GPU got heavily utilized, the temperature easily exceeded 95°C and sometimes even reached the point where my notebook would simply shut off entirely.
    I finally took the time to do some research and it seems like this is a common issue with Dell notebooks. There are numerous reports about Dell notebooks either having their fans running at high speeds all the time, doing a constant spin up / spin down cycle or - like in my case - simply doesn't do proper cooling at all. The reason for these issues most of the time is that the notebook's BIOS takes full control over the fans and doesn't do a good job at that.
    Under Linux there are the i8kutils but these cannot change the fan speeds permanently because the BIOS keeps control over the fans.
    Luckily there is now a tool called dell-bios-fan-control which can toggle BIOS control of the fans.
    With the help of this tool I can finally set the GPU fan to full speed when necessary and do no longer have to fear overheating or even instant shut offs anymore.
    Now all I need is a tool that can independently monitor CPU and GPU temperatures and set the corresponding fans as necessary to keep my notebook cool.